More Than Just Cosmetics: Why Regular Nail Trims Are Crucial
Regular nail trims are far more than just a cosmetic routine for your canine companion; they are a vital aspect of their overall health and well-being. Neglecting your dog’s nails can lead to a cascade of painful issues and long-term health problems, significantly impacting their quality of life.
One of the most immediate and critical benefits of consistent nail care is the prevention of pain and discomfort. Overgrown nails can curve under and dig into the sensitive paw pads, causing significant discomfort and even infection with every step [Source: Dogscare.life – How to Groom Your Dog at Home]. This constant pain can transform simple activities like walking, running, and playing into miserable experiences for your dog, leading to reduced activity levels and a diminished overall quality of life.
Beyond immediate discomfort, excessively long nails can severely impact your dog’s posture and natural gait. When nails are too long, they push the toes upwards and backwards, forcing the paw to splay and shifting the dog’s weight distribution. This unnatural posture places undue stress on the paw joints, legs, and even the spine, contributing to long-term orthopedic issues such as arthritis, chronic joint pain, and malformation of the foot [Source: Dogscare.life – Best Dog Care Tips]. Maintaining proper nail length ensures your dog’s paws can sit correctly and naturally on the ground, promoting healthy alignment and overall posture.
In summary, maintaining trimmed nails is fundamental to preventing painful injuries, supporting correct posture, and contributing to the long-term joint health of your dog. It’s a simple routine that ensures they can move comfortably, happily, and without impediment throughout their entire life.
Tooling Up: Choosing the Right Equipment for the Job
When it comes to maintaining your dog’s nail health, selecting the appropriate tools is crucial for both effectiveness and safety. The two primary categories of tools for nail care are clippers and grinders, each offering distinct advantages depending on your dog’s size, nail type, and temperament. For a more comprehensive guide on dog grooming, consider exploring our article on How to Groom Your Dog at Home.
Nail Clippers
Nail clippers come in several designs, each suited for different needs:
- Scissor-Style Clippers: These resemble a pair of scissors with curved, sharp blades. They are often preferred for their precision and are well-suited for small to medium-sized dogs with thinner nails. The design allows for a clear view of the nail, significantly reducing the risk of cutting the quick.
- Guillotine-Style Clippers: This type features a small hole where the nail is inserted, and a blade slides across to make the cut. They are generally best for small to medium dogs with relatively thin to medium thickness nails. Some users find them less intuitive to use, and they can sometimes crush the nail if the blade is dull or the dog has very thick nails [Source: PetMD].
- Pliers-Style Clippers (Resco or Heavy-Duty): These robust clippers resemble pliers and are designed specifically for large breeds with thick, strong nails. They offer significant leverage, making it much easier to cut through dense nails. These are a popular choice among professional groomers and owners of larger breeds like Rottweilers or Labrador Retrievers [Source: American Kennel Club].
When choosing clippers, always consider your dog’s size and nail thickness. Small clippers are ideal for Chihuahuas, while larger, more robust clippers are necessary for breeds with substantial nails.
Nail Grinders
Nail grinders, also known as rotary tools or Dremels, utilize a rotating abrasive head to file down the nail. They are typically powered by batteries or electricity and offer several distinct benefits:
- Reduced Risk of Quicking: Grinders slowly file down the nail, allowing for more control and significantly reducing the chance of cutting into the quick (the sensitive blood vessel and nerve supply within the nail) [Source: VCA Animal Hospitals]. This is particularly beneficial for dogs with dark nails where the quick is not visible.
- Smooth Finish: Grinders leave a smooth, rounded edge, preventing scratches on floors or furniture and reducing the likelihood of snags.
- Ideal for Anxious Dogs: Some dogs are more tolerant of the vibrating sensation of a grinder than the sudden pressure and sound of clippers.
- Thick Nails: Grinders are excellent for dogs with very thick or brittle nails that may splinter or crack when using clippers.
When selecting a grinder, look for models with variable speeds and different grit sanding bands. Introduce the grinder slowly and positively to your dog to build a comfortable association.
Choosing the Best Tool
The best tool for your dog often depends on a combination of factors, including:
- Dog Size & Nail Thickness:
- Small Dogs (e.g., Chihuahuas, Toy Poodles): Scissor-style clippers or small guillotine clippers are usually sufficient. A small, quiet grinder can also be very effective.
- Medium Dogs (e.g., Beagles, Corgis): Scissor-style or guillotine clippers work well for average nails. A grinder is a good alternative, especially for nervous dogs or those with thicker nails.
- Large & Giant Breeds (e.g., German Shepherds, Rottweilers): Pliers-style clippers are often necessary for their thick, strong nails. Grinders are also highly recommended for precise trimming and to smooth any rough edges.
- Nail Color: For dogs with dark nails, where the quick is hard to see, a grinder offers a safer approach as it allows for gradual reduction. If using clippers on dark nails, trim small portions at a time, checking the cut surface frequently.
- Dog’s Temperament: If your dog is anxious or fearful of clippers, a grinder might be a less stressful alternative. Positive reinforcement and gradual introduction are key with any tool [Source: ASPCA].
- Your Comfort Level: Choose a tool you feel confident and comfortable using. If you’re unsure or nervous, consult with your veterinarian or a professional groomer for a demonstration and personalized advice.
Ultimately, having both a good pair of clippers and a grinder can be beneficial, allowing you to choose the best method for each nail or situation, ensuring your dog’s paws remain healthy and comfortable.
The Gentle Art of the Trim: A Step-by-Step Safety Guide
Regular nail trimming is a vital part of your dog’s grooming routine, preventing discomfort, pain, and potential health issues. Overgrown nails can lead to splayed toes, difficulty walking, and even joint problems over time [Source: American Kennel Club]. With a calm approach, patience, and the right technique, you can safely trim your dog’s nails at home. For more comprehensive grooming tips, see our guide on How to Groom Your Dog at Home.
Essential Tools for a Safe Trim:
- Dog Nail Clippers: Choose between scissor-style or guillotine-style clippers, ensuring they are sharp and appropriate for your dog’s size and nail thickness [Source: The Humane Society of the United States].
- Styptic Powder: Keep this immediately on hand to quickly stop bleeding if you accidentally cut the quick. Cornstarch can also work as an emergency alternative.
- High-Value Treats: Positive reinforcement makes the experience more pleasant and rewarding for your dog.
Step-by-Step Guide to Safe Nail Trimming:
- Get Comfortable: Find a quiet, well-lit area where both you and your dog are relaxed. Have treats readily available to reward good behavior. A calm environment is key to a stress-free experience.
- Acclimate Your Dog: If your dog is new to nail trims, start by simply handling their paws and rewarding them with treats and praise. Gradually introduce the clippers or grinder, letting them sniff and investigate the tools without pressure.
- Positioning: Hold your dog’s paw firmly but gently. Extend each toe, making sure all fur is out of the way to clearly see the entire nail.
- Identify the Quick: The “quick” is a sensitive part of the nail that contains blood vessels and nerves. Cutting into it causes pain and bleeding.
- For Clear or Light-Colored Nails: The quick appears as a pink or reddish area within the translucent nail. You should only cut the white tip beyond the quick [Source: VCA Hospitals].
- For Dark-Colored Nails: Identifying the quick is much trickier. Look at the underside of the nail; you’ll typically see a small, lighter, oval-shaped area just before the quick begins. It’s safer to trim small slivers at a time until you see a gray or black dot in the center of the cut surface, which indicates you are very close to the quick [Source: ASPCA].
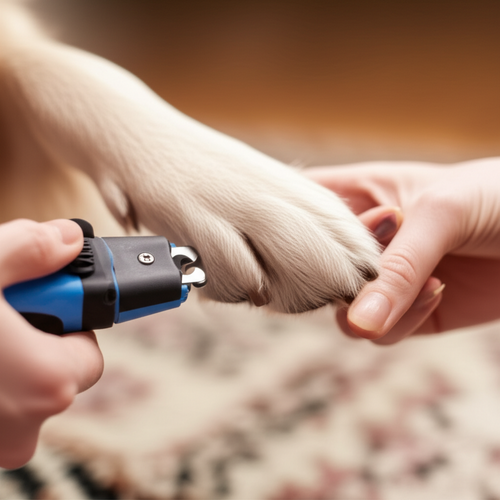
- Make the Cut: Hold the clippers at a 45-degree angle to the floor (or to the nail, depending on your dog’s paw anatomy). With a swift, confident motion, snip off the very tip of the nail, ensuring you are well below the quick. Hesitation can lead to crushing the nail.
- Repeat and Reward: Continue with each nail, offering praise and treats after each successful trim. If your dog becomes stressed or shows signs of anxiety, take a break and try again later or another day. It’s better to do a few nails at a time than to force a full session.
- Smooth Rough Edges (Optional): After trimming, use a nail file or a Dremel-style grinder to smooth any sharp edges, preventing scratches and snags.
What If You Cut the Quick?
If you accidentally cut the quick, your dog will likely yelp in pain, and the nail will begin to bleed. Don’t panic. Remain calm, and immediately apply styptic powder directly to the bleeding nail. Apply gentle but firm pressure with a clean cloth or your finger until the bleeding stops [Source: Preventive Vet]. Reassure your dog with a calm voice and gentle petting. It’s crucial to make the next trimming experience more positive to prevent future fear and anxiety surrounding nail trims.
Happy Paws, Happy Dog: Making Nail Trimming a Stress-Free Experience
Trimming your dog’s nails can often be perceived as a challenging or even dreaded task by both pets and owners. However, with the right approach, it can truly become a stress-free and positive experience for both of you. Implementing positive reinforcement, gradual desensitization, and proper handling techniques are key to making nail care a comfortable and routine part of your dog’s life. For more general training advice that can help with any cooperative care procedure, you can explore our article on Dog Training Techniques: Mastering the Art of Training.
Positive Reinforcement: Making it Fun
Positive reinforcement involves rewarding desired behaviors, thereby creating a strong, positive association with the nail trimming process. This approach can include:
- Treats: Offer high-value, delicious treats before, during, and immediately after each step of the process. For example, give a treat just for letting you touch their paw, then another for allowing you to touch the clippers to their nail, and so on [Source: Preventive Vet].
- Praise and Affection: Use a happy, calm, and encouraging voice, providing plenty of verbal praise and gentle petting whenever your dog cooperates, no matter how small the step.
- Playtime: Incorporate a short, fun play session immediately after a successful nail trim. This helps to end the experience on a high note, leaving your dog with a positive memory associated with the activity [Source: American Kennel Club].
Desensitization: Gradual Introduction
Desensitization slowly introduces your dog to the nail trimming tools and the process itself, incrementally reducing their fear and anxiety. This is a gradual process that may take days, weeks, or even longer, depending on your dog’s initial comfort level:
- Start Small: Begin by simply showing your dog the clippers or grinder from a distance. Let them sniff it and then immediately reward them with a treat and praise [Source: American Kennel Club]. The goal is for them to see the tool as a predictor of good things.
- Touch and Reward: Gradually progress to touching their paws, then touching the clippers to their nails without actually trimming. Each step, no matter how minor, should be accompanied by generous rewards.
- Sound Association: If using a grinder, turn it on in another room so your dog can get used to the sound from a distance. Slowly bring it closer over multiple sessions, always rewarding calm behavior [Source: Preventive Vet].
Handling Tips: Ensuring Comfort and Safety
Proper handling not only ensures your dog’s physical safety but also significantly contributes to their comfort and willingness to cooperate during nail trims.
- Find a Comfortable Position: Choose a quiet, well-lit area where both you and your dog can be comfortable and secure. This might be on the floor, on a raised non-slip surface, or with your dog in your lap.
- Gentle Restraint: If needed, use gentle, firm restraint rather than forceful holding. The goal is to provide stability, not to pin them down. If your dog struggles excessively, pause, release, and try again later after a break [Source: ASPCA].
- Short Sessions: Keep sessions brief, especially when first starting or with an anxious dog. Even successfully trimming just one nail and then rewarding your dog is a significant success and builds positive momentum [Source: American Kennel Club].
- Know Your Dog’s Quick: Always be aware of the “quick,” the sensitive part of the nail that contains blood vessels and nerves. Cutting into it can be painful and cause bleeding [Source: Preventive Vet]. If you’re unsure about quick location, particularly with dark nails, consult your veterinarian or a professional groomer for guidance. For more general grooming advice, see How to Groom Your Dog at Home.
By consistently applying these techniques, you can transform nail trimming from a dreaded chore into a positive bonding experience, ensuring your dog’s paws stay healthy and happy.
Oops! What to Do When Accidents Happen
Even with the most careful preparation and execution, minor accidents can happen when dealing with pets. If your dog sustains a minor cut, or if you accidentally quick them during a nail trim, knowing how to react calmly and effectively can prevent further complications and ensure a swift recovery. For more general advice on keeping your furry friend healthy and happy, consider reading our Best Dog Care Tips.
Immediate First-Aid for Minor Cuts
A superficial cut that isn’t deep or bleeding profusely can often be managed at home with basic first-aid supplies. Here’s a quick guide to handling such situations:
- Assess the Wound: First, gently separate the fur around the cut to get a clear and unobstructed view. Look carefully for any embedded objects, excessive bleeding, or signs of deep tissue involvement.
- Cleanse the Area: Use lukewarm water and a mild, pet-safe antiseptic solution (such as diluted povidone-iodine or chlorhexidine) to gently clean the wound. Avoid harsh soaps, hydrogen peroxide, or alcohol, which can irritate sensitive skin and impede healing. Carefully trim any fur around the wound if it’s getting in the way, but be very cautious not to cut the skin.
- Stop the Bleeding: For minor bleeding, apply gentle direct pressure with a clean cloth or sterile gauze for a few minutes. Maintain continuous pressure without peeking. If the bleeding doesn’t stop after 5-10 minutes of continuous pressure, it’s a clear sign that you should contact your veterinarian immediately.
- Protect the Wound: Once the wound is clean and dry, you can apply a thin layer of a pet-safe antibiotic ointment (ensure it’s explicitly safe if licked, or apply with supervision). Cover the wound with a sterile non-stick pad and a light, breathable bandage. Ensure the bandage isn’t wrapped too tightly, as this can cut off circulation and cause further harm. Change the bandage daily, and re-clean the wound each time.
- Prevent Licking: Dogs naturally want to lick their wounds as a self-soothing mechanism, but this can introduce harmful bacteria, lead to infection, and significantly hinder the healing process. An Elizabethan collar (e-collar), often called a “cone of shame,” or a recovery suit can be very effective in preventing your dog from reaching and licking the injured area.
When to Seek Veterinary Advice
While many minor cuts can be handled at home, some situations warrant immediate veterinary attention. Do not hesitate to contact your veterinarian if you observe any of the following signs or symptoms:
- Deep or Gaping Wounds: If the cut is deep, wide, or exposes underlying tissue (like muscle or bone), stitches may be required to close it properly, prevent infection, and facilitate healing.
- Excessive Bleeding: If the bleeding is profuse, spurting (indicating arterial bleeding), or simply doesn’t stop after 10 minutes of direct, continuous pressure.
- Embedded Objects: If there’s glass, metal, splinters, or any other foreign object lodged deeply in the wound. Attempting to remove it yourself could cause more damage or introduce further contamination.
- Limping or Pain: If the cut is on a paw or leg and your dog is noticeably limping, refusing to put weight on the limb, or shows any signs of severe pain (e.g., yelping when touched, aggression).
- Signs of Infection: Observe the wound closely for redness, swelling, warmth around the affected area, discharge of pus, or a foul odor. These are clear indicators of an infection that requires veterinary treatment, potentially including antibiotics.
- Location of the Cut: Wounds near sensitive areas like joints, eyes, mouth, nose, or genitals are often more serious due to the risk of complications or damage to vital structures.
- Unusual Behavior: If your dog becomes lethargic, loses appetite, develops a fever, or exhibits any other unusual behavior after the injury, it could indicate a more serious underlying issue or systemic infection.
Prompt action and careful observation are crucial to ensuring your dog’s speedy and full recovery from a minor cut. For information on training techniques that can help your dog remain calm and cooperative during such events, check out our guide on Mastering the Art of Training.
Sources
- American Kennel Club – How to Trim Dog Nails Safely
- American Kennel Club – How to Trim Dog’s Nails
- American Kennel Club
- ASPCA – Dog Grooming Tips
- ASPCA – Nail Trimming
- ASPCA
- The Humane Society of the United States – Trimming Your Dog’s Nails
- PetMD
- Preventive Vet – 7 Tips For Stress-Free Nail Trims For Your Dog
- Preventive Vet – What to Do When You Cut Your Dog’s Quick
- VCA Animal Hospitals
- VCA Hospitals – How to Trim Your Dog’s Nails